도커라이징 하는 방법
이번 포스트에서는 node.js app을 도커라이징 하는 방법에 대해서 알아봅니다.
prerequisite
- node.js
- docker
Create package.json
{
  "name": "docker_web_app",
  "version": "1.0.0",
  "description": "Node.js on Docker",
  "author": "First Last <first.last@example.com>",
  "main": "server.js",
  "scripts": {
    "start": "node server.js"
  },
  "dependencies": {
    "express": "^4.16.1"
  }
}
package.json을 생성한다. 해당 예제는 설명을 위한 최소한도로 설정해놓았다.
Create server.js
'use strict';

const express = require('express');

// Constants
const PORT = 3000;
const HOST = '0.0.0.0';

// App
const app = express();
app.get('/', (req, res) => {
  res.send('Hello World');
});

app.listen(PORT, HOST);
console.log(`Running on http://${HOST}:${PORT}`);
Dokerizing 할때 server의 host를 반드시 0.0.0.0으로 설정해야한다. 그렇지 않으면 서버는 도커이미지 안에서 127.0.0.1으로 통신되기 때문에 도커 이미지안에서만 서버와 통신이 된다. 따라서, 0.0.0.0으로 호스트를 설정해야 도커 이미지의 외부와 통신이 된다.
* nest.js 또는 다른 framework를 사용할때도 host를 반드시 넣어야한다.
Creating a Dockerfile
Dockerfile 작성
FROM node:14

# Create app directory
WORKDIR /usr/src/app

# Install app dependencies
# A wildcard is used to ensure both package.json AND package-lock.json are copied
# where available (npm@5+)
COPY package*.json ./

RUN npm install
# If you are building your code for production
# RUN npm ci --only=production

# Bundle app source
COPY . .

EXPOSE 3000
CMD [ "node", "server.js" ]
설명
1. FROM 을 통해서 해당 이미지의 base가 될 이미지를 선택한다. 이 이미지는 우선적으로 local에서 image찾는다. 만약, local에 image가 없을 경우, dockerhub에서 image를 Pull 한다.
2. WORKDIR 은 이미지안에서 어떤 디렉토리로 사용할 것인가 지정하는것이다.
3. COPY package*.json을 통해서
.dockerignore file
node_modules
npm-debug.log
.gitingnore과 같은 개념으로써, docker build할때 제외시키는 항목이다.
Building your image
docker build -t <your username>/node-web-app .
docker build를 통해서 이미지를 생성한다. -t 는 이미지 이름을 지정하는것이고, . 은 현재 디렉토리에서 Dockerfile을 찾는다는 뜻이다.
Run the image
docker run -p 3000:3000 -d <your username>/node-web-app
docker run을 통해 내가 만든 이미지를 실행시킨다. -p를 통해 포트를 맵핑 시켜준다. <서버의 port number>:<image의 port number> 으로 맵핑시킨다. -d는 어떤 이미지를 사용하는가를 나타낸다.
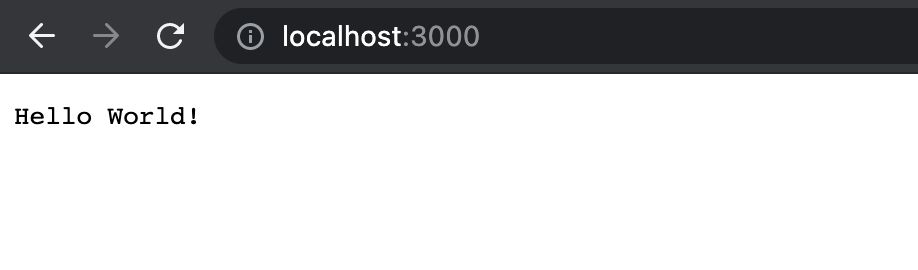
성공적으로 통신이 되었다.
회고)
처음엔 host를 0.0.0.0으로 설정하지 않았어서 통신이 안되었었다...! 반드시 host에 0.0.0.0을 넣어서 통신이 잘되는것을 확인하자.
다음글)
해당 이미지를 가지고 k8s에 backend를 pod 형태로 띄우는방법